


How to Find and Delete Duplicate Files on Your Mac
Duplicate files on your Mac take up space, slow down performance, and complicate file management. But finding and deleting all the duplicate files in hundreds of gigabytes of Mac storage seems an insurmountable task.
That’s why you should use a third-party app to do it instead. In this post, we’ve explained how to use two of the best apps for finding and deleting duplicate Mac files. We even explained how you can do it yourself using Finder, if you prefer to do things the hard way.
Related:
A Word of Warning About Third-Party Apps
There’s a veritable clone army of third-party apps designed to find and delete duplicate Mac files. All you need to do is perform a quick Google search to find yourself inundated with options.
But you shouldn’t be quick to trust any of them.

For an app to find and delete duplicate files on your Mac, it needs access to all the data on your computer. This includes a lot of personal information, which bad apps might sell or use against you.
You should always be careful when downloading third-party apps from the Internet. Especially if you plan to grant those apps access to your private data.
Conduct your own research to ensure apps are well-reviewed before you install them. We’ve selected our favorite two apps below—one free option and one premium option—but you should do your own research as well.
Using Finder to Find and Delete Duplicate Mac Files
If you would rather avoid installing a third-party app, use Finder to find and delete duplicate Mac files instead. This method is incredibly time-consuming and can lead to more mistakes, but it doesn’t risk your security.

Using Finder involves looking at every file on your Mac to spot duplicates yourself. The easiest way to do this is by creating a Smart Folder which lets you sort every file by name. Then look over the names to find any exact copies.
- Open Finder on your Mac and go to File > New Smart Folder.
- In the window that opens, click the + (Plus) icon in the top-right corner to create a search filter for your Smart Folder.
- In the first drop-down menu, select Kind, then choose the kind of files you’re looking for from the second drop-down menu.
- After you do so, the Finder window should fill up with all the matching files on your Mac.
- Click Name to sort the results, then work through the list one-by-one looking for duplicate files.

When you find two files with duplicate names, highlight each of them and press Space to preview them. Make sure the content of each file is identical before moving any duplicates to the Trash.
dupeGuru: Find and Delete Duplicate Mac Files for Free
This cross-platform app is totally free and open source. You can use dupeGuru to find duplicate files, songs, and pictures on your Mac in minutes.
How to Install dupeGuru on Your Mac
dupeGuru works on Linux, Windows, and macOS. To install it on your Mac, download the OS X version directly from the dupeGuru website.
Download: dupeGuru (Free)
When the download finishes, drag dupeGuru to your Applications folder to complete the installation. If a warning message doesn’t let you open dupeGuru, control-click the app and select Open from that menu instead.

How to Use dupeGuru to Find Duplicate Mac Files
After opening dupeGuru, choose an Application Mode, depending on the type of files you hope to find:
- Standard
- Music
- Picture
Use Standard if you’re looking for duplicate files or folders on your Mac.
Choose your Scan Type from the drop-down menu below. The particular options in this menu change depending on your Application Mode, but for most purposes, you should use Contents.

Finally, click the + (Plus) button in the bottom-left corner to add the folder, or folders, you want to scan for duplicates.
We suggest you choose the Home folder to scan, which you can select using the shortcut Cmd + Shift + H. Although you might scan any folder you like.
Be careful deleting files from the System or Library folders, since you can damage the operating system on your Mac.
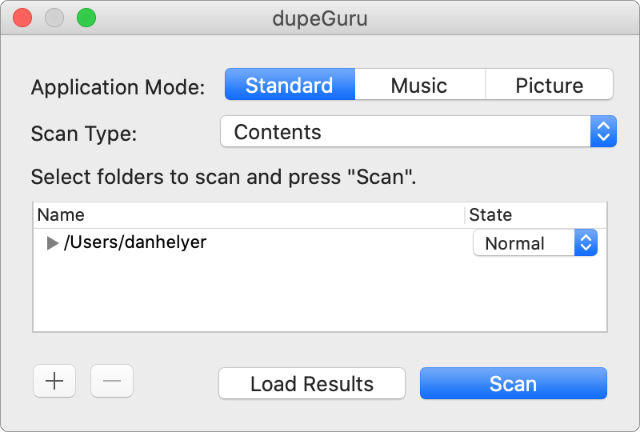
Finally, click Scan to find duplicate files in your selected folders. You may need to Allow dupeGuru access to various folders to complete the scan.
How to Use dupeGuru to Delete Duplicate Mac Files
After dupeGuru finishes its scan, you should see a list of all the duplicate files on your Mac. dupeGuru automatically marks the newer or higher-quality copies in blue. These are called your reference files and don’t get deleted.
Before going any further, take a few minutes to review the duplicate files.

Check the filename, file path, and file size for each duplicate in the list of results. You might also want to highlight a particular result and click the Eye icon to preview it—that way you can be certain it’s truly a duplicate before deleting the file.
If you’re unhappy with dupeGuru’s choice, you can control-click and select Make Selected into Reference to change the file you want to keep.
After reviewing the results, click the Cog icon to see options for deleting your duplicate files. If you’re happy to remove the selected copies in dupeGuru, choose to Send Marked to Trash.

Gemini: A Small Price to Pay for a Sleek User Interface
If you’re after a more polished finish, look no further than Gemini 2: The Duplicate Finder. This premium app is developed by MacPaw, the creators of other useful utilities, such as CleanMyMac X.
Gemini 2 presents a sleek interface that makes it easy to find and manage duplicate files, photos, or songs on your Mac. It costs $19.95 for a year subscription, but you can also take advantage of the three-day free trial.
How to Download Gemini on your Mac

You can download Gemini directly through the MacPaw website or through the Mac App Store. After downloading and opening the app, it prompts you to sign up for a subscription or a one-time fee.
If you agree to the fee, you can still take advantage of the three-day free trial. But you need to make sure you cancel your subscription one day before the trial ends if you don’t want to get charged.
Download: Gemini 2 ($19.95/year)
How to Use Gemini to Find Duplicate Mac Files
After opening Gemini, click the large + (Plus) icon in the middle of the window to begin scanning for duplicate files on your Mac. You can choose to scan in three default locations—Home, Music, or Pictures—or choose a custom folder instead.

After you pick your folder, click Scan for Duplicates and grant Gemini the permission it needs to access your data. It may take several minutes for the scan to complete, depending on the size of the search.
How to Use Gemini to Delete Duplicate Mac Files
After Gemini finishes scanning your Mac, it shows an overview of your duplicate files. This overview tells you how many duplicates Gemini found along with how much space they take up.
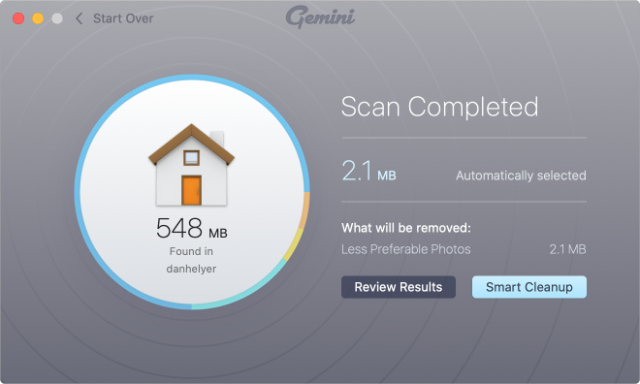
Choose to remove your duplicates automatically using Smart Cleanup or click Review Results to look at all the duplicate files in detail.
From here, you can use the sidebar to filter the results by filetype or similarity. Then look at your duplicate files in the main window. You can preview each file and look at its location before selecting the ones you want to delete.

When you’re happy with the selection, click Smart Cleanup or Remove in the bottom-right corner to delete your duplicates. Don’t worry, you can always undo this action again if you make a mistake.
Find Other Ways to Create Free Space

Using the apps we’ve mentioned in this post, you shouldn’t have any problem finding and deleting all the duplicate files on your Mac. Hopefully, it helped to speed up your machine and clear out some free storage.
But if your Mac is already too full, you might find it’s even not possible to delete files anymore. If that happens to you, here are all the ways to fix if your Mac startup disk is too full.

He spent two years supervising repairs as a Genius Admin for Apple Retail and uses that knowledge to keep our troubleshooting guides up to date.
Long before that, Dan turned to Apple products from a musical background. Having owned iPods for years, he bought a MacBook to learn sound recording and production. It was using those skills that he gained a first-class Bachelor of Science in Sound Technology.